
In this tutorial, you will how to move your facebook apps to bidding using AppLovin Max as mediation network. How to integrate both Facebook Audience Network and AppLovin in same app. How to integrate AppLovin Max Banner and Interstitial Ads in Android Studio using Java. Follow these simple steps.
1. First create AppLovin Account. Open the link https://www.applovin.com/ Click on Sign Up and create Account.


Then Sign In to AppLovin account and complete your account creation. From bottom left side, click on Account, complete basic info, 2 step verification

Then in Payment tab, click on Info and complete all info. Add complete payment method and tax info. To make this tutorial short, I'll not show these steps.

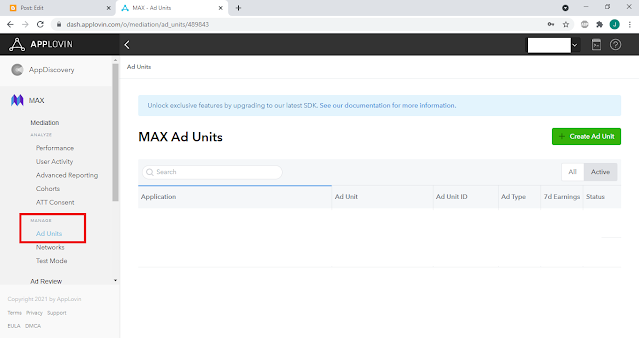
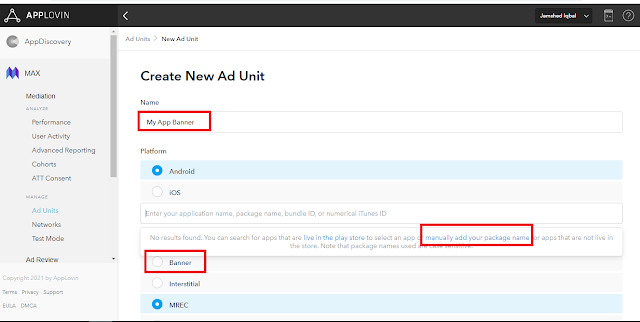
Now click on Create Ad Unit. Here you have to add your app info. Write app name here. Now here you have to write your apps package name if it is already published on PlayStore, it will fetch info, if your app is not published on playstore, then on Manually Ad your Package Name. Here paste your app package name . Then select Banner. Finally click on save. Repeating same method you have to add Interstitial ad Unit.
Now first create your property if you have not created it already. If you have already added your app, then click left 3 bars, click integration, then bidding integration.

Select MAX as mediation platform

Now copy your banner ad ID,

Now again go to AppLovin Max interface,
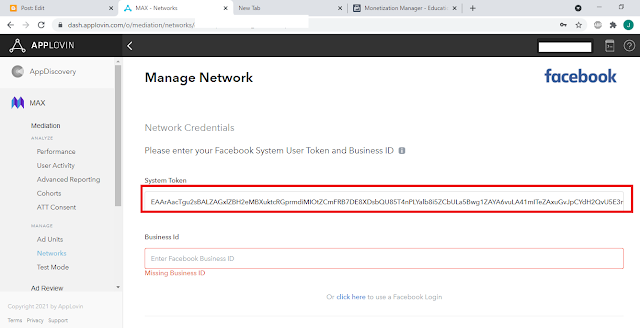
Here in MAX tab, under Manage, click on Networks. and select Facebook and click Connect


Now open facebook Monetization manager tab and under placement ids, click on Generate API Token

Check this check box and click Generate Token. Now copy this token.

Now go to Max tab where we left and paste here that copied token.
Now again go to Monetization Manager, and here in the address bar, you will see Business ID, copy this id.

Again go to Max and paste that id here.

Finally click on save. You will get success message. If you get error of could not connect, then possible reason for this error maybe you have not added account info in max, or facebook has not yet approved your bid request, so for this reason you may have to wait about 2 or 3 days. After you successfully connect AppLovin with facebook.
Now Click on Ad Units and select Banner Ad.

Now under Participating Networks, select Facebook Bidding

Now switch on this status

Then go to facebook Monetization Manager and copy Banner ad placement ID.

Now go to Max and paste that placement ID here and finally click save.

Now go to Networks and check whether you have successfully connected to facebook or not, If you get this green tick, it means AppLovin is successfully connected to Facebook Audience Network, if it is not connected, then you will see yellow warning icon.

Now repeat these steps to add facebook interstitial ad id in AppLovin.
Now you have to add test device in both AppLovin and Facebook. Go to your phone settings, then click on Google, then click on Ads, here you will see Google ad id. Copy this id.


Here write your device name, write google ad id and under test network select AppLovin.

Finally click save. Now repeat these steps for facebook. Go to Monetization Manager and under Integration, click on Testing.

Switch on Testing Enabled, then write google ad id , write device name and click Add

First open App Level build.gradle and add following 4 dependencies.
implementation 'com.facebook.android:audience-network-sdk:6.5.1'
implementation 'com.applovin:applovin-sdk:10.3.1'
implementation 'com.applovin.mediation:facebook-adapter:6.5.1.0'
implementation 'com.google.android.gms:play-services-location:18.0.0'
Now go to MAX and click here on Mediation Documents.

Select Android , scroll down and here you will find unique API key, please note that this API key is different for every account. You have to copy both these plugins.


maven { url 'https://artifacts.applovin.com/android' }
Now in this file under dependencies, add following classpaths in it.
classpath "com.applovin.quality:AppLovinQualityServiceGradlePlugin:3.0.0"
classpath 'com.google.gms:google-services:4.3.8'
classpath 'com.google.gms:google-services:4.3.8'
Now in res folder, create new directory named xml.Right click on that xml directory and create new xml resource file and name it as
network_security_config and save it.Now open that xml file and remove existing code and paste following code.ActivitySecond.xml<?xml version="1.0" encoding="utf-8"?>
<network-security-config>
<domain-config cleartextTrafficPermitted="true">
<domain includeSubdomains="true">127.0.0.1</domain>
</domain-config>
</network-security-config>Now open AndroidManifest.xml file and add internet permissions and under application tag,
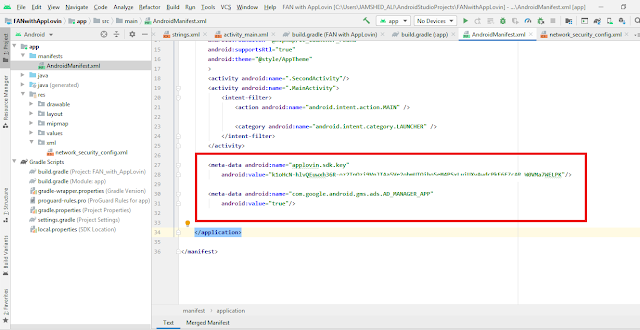
paste following codeandroid:networkSecurityConfig="@xml/network_security_config"Now go to Max Documents and add these 2 metadata codes of sdk key. Remember sdk key is
tools:targetApi="n"unique for every account. so copy it from your own account after login.<meta-data android:name="applovin.sdk.key"
android:value="WRITE HERE YOUR SDK KEY FROM YOUR MAX ACCOUNT DOCUMENTATION"/>
<meta-data android:name="com.google.android.gms.ads.AD_MANAGER_APP"
android:value="true"/>Now go to ActivityMain.xml and create a button and a banner ad placement container as<Button
android:id="@+id/showinterstitialadbutton"
android:layout_width="wrap_content"
android:layout_height="wrap_content"
android:layout_alignParentStart="true"
android:layout_alignParentTop="true"
android:layout_alignParentEnd="true"
android:layout_marginStart="113dp"
android:layout_marginTop="232dp"
android:layout_marginEnd="117dp"
android:text="Show Interstitial Ad"
app:layout_constraintBottom_toBottomOf="parent"
app:layout_constraintLeft_toLeftOf="parent"
app:layout_constraintRight_toRightOf="parent"
app:layout_constraintTop_toTopOf="parent" />
<com.applovin.mediation.ads.MaxAdView
xmlns:maxads="http://schemas.applovin.com/android/1.0"
android:id="@+id/MaxAdView"
maxads:adUnitId="YOUR MAX BANNER AD ID HERE"
android:background="@android:color/white"
android:layout_centerHorizontal="true"
android:layout_alignParentBottom="true"
android:layout_width="match_parent"
android:layout_height="50dp" />Please note that you have to use real banner and intertitial ad ids.
Now go to MainActivity.java and create two variables like thisprivate MaxInterstitialAd interstitialAd;
private int retryAttempt;
Now initialize sdk and call a method ShowMaxBannerAd under onCreate.
AppLovinSdk.getInstance( this ).setMediationProvider( "max" );
AppLovinSdk.initializeSdk( this, new AppLovinSdk.SdkInitializationListener() {
@Override
public void onSdkInitialized(final AppLovinSdkConfiguration configuration)
{
ShowMaxBannerAd();
}
} );Now outside of sdk initialization, call method of LoadMaxInterstitialAd();
Now create a button and set onClick when button is pressed, call ShowInterstitial ad asButton showIntAdButton = findViewById(R.id.showinterstitialadbutton);
showIntAdButton.setOnClickListener(new View.OnClickListener() {
@Override
public void onClick(View view) {
ShowMaxInterstitialAd();
}
});
Now outside of onCreate, create 3 methods like this
public void ShowMaxBannerAd(){
MaxAdView maxBannerAdView = findViewById(R.id.MaxAdView);
maxBannerAdView.loadAd();
}
public void LoadMaxInterstitialAd(){ interstitialAd = new MaxInterstitialAd( "YOUR MAX INTERSTITIAL AD ID HERE", this ); MaxAdListener maxAdListener = new MaxAdListener() { @Override public void onAdLoaded(final MaxAd maxAd) { retryAttempt = 0; } @Override public void onAdLoadFailed(final String adUnitId, final MaxError error) { retryAttempt++; long delayMillis = TimeUnit.SECONDS.toMillis( (long) Math.pow( 2, Math.min( 6, retryAttempt ) ) ); new Handler().postDelayed(new Runnable() { @Override public void run() { interstitialAd.loadAd(); } }, delayMillis ); } @Override public void onAdDisplayFailed(final MaxAd maxAd, final MaxError error) { interstitialAd.loadAd(); } @Override public void onAdDisplayed(final MaxAd maxAd) {} @Override public void onAdClicked(final MaxAd maxAd) {} @Override public void onAdHidden(final MaxAd maxAd) { interstitialAd.loadAd(); } }; interstitialAd.setListener( maxAdListener ); interstitialAd.loadAd(); }
public void ShowMaxInterstitialAd( Class activityname){ if ( interstitialAd.isReady() ) { interstitialAd.showAd(); Intent intent = new Intent(this, activityname); //intent.putExtra("jam", input); startActivity(intent); }else { Intent intent = new Intent(this, activityname); startActivity(intent); } }
To find ad ids, go to max, click on Ad Units, you will find here you ad ids.
Finally create an Acitivity named SecondActivity. Now test your app. After testing. After testing
create signed APK and publish your app on playstore. In this way both FAN and AppLovin ads will
be shown in your app. The final code is asapp level build.gradleapply plugin: 'com.android.application'
apply plugin: 'applovin-quality-service'
applovin {
apiKey "ReplaceWithYOurOwnKey"
}
android {
compileSdkVersion 30
buildToolsVersion "29.0.3"
defaultConfig {
applicationId "com.learnandroidin15minutes.fanwithapplovin"
minSdkVersion 19
targetSdkVersion 30
versionCode 1
versionName "1.0"
testInstrumentationRunner "androidx.test.runner.AndroidJUnitRunner"
}
buildTypes {
release {
minifyEnabled false
proguardFiles getDefaultProguardFile('proguard-android-optimize.txt'), 'proguard-rules.pro'
}
}
}
dependencies {
implementation fileTree(dir: "libs", include: ["*.jar"])
implementation 'androidx.appcompat:appcompat:1.3.0'
implementation 'androidx.constraintlayout:constraintlayout:2.0.4'
testImplementation 'junit:junit:4.12'
androidTestImplementation 'androidx.test.ext:junit:1.1.3'
androidTestImplementation 'androidx.test.espresso:espresso-core:3.4.0'
implementation 'com.facebook.android:audience-network-sdk:6.5.1'
implementation 'com.applovin:applovin-sdk:10.3.1'
implementation 'com.applovin.mediation:facebook-adapter:6.5.1.0'
implementation 'com.google.android.gms:play-services-location:18.0.0'
implementation 'androidx.recyclerview:recyclerview:1.2.1'
}
Project level build.gradle
// Top-level build file where you can add configuration options common to all sub-projects/modules.
buildscript {
repositories {
maven { url 'https://artifacts.applovin.com/android' }
google()
jcenter()
}
dependencies {
classpath "com.android.tools.build:gradle:4.0.2"
classpath "com.applovin.quality:AppLovinQualityServiceGradlePlugin:3.0.0"
classpath 'com.google.gms:google-services:4.3.8'
// NOTE: Do not place your application dependencies here; they belong
// in the individual module build.gradle files
}
}
allprojects {
repositories {
google()
jcenter()
}
}
task clean(type: Delete) {
delete rootProject.buildDir
}
The network-security-config.xml file is here:
<?xml version="1.0" encoding="utf-8"?>
<network-security-config>
<domain-config cleartextTrafficPermitted="true">
<domain includeSubdomains="true">127.0.0.1</domain>
</domain-config>
</network-security-config>
AndroidManifest.xml file is:
<?xml version="1.0" encoding="utf-8"?>
<manifest xmlns:android="http://schemas.android.com/apk/res/android"
xmlns:tools="http://schemas.android.com/tools"
package="com.learnandroidin15minutes.fanwithapplovin">
<uses-permission android:name="android.permission.INTERNET"/>
<application
android:networkSecurityConfig="@xml/network_security_config"
tools:targetApi="n"
android:allowBackup="true"
android:icon="@mipmap/ic_launcher"
android:label="@string/app_name"
android:roundIcon="@mipmap/ic_launcher_round"
android:supportsRtl="true"
android:theme="@style/AppTheme"
>
<activity android:name=".SecondActivity"/>
<activity android:name=".MainActivity">
<intent-filter>
<action android:name="android.intent.action.MAIN" />
<category android:name="android.intent.category.LAUNCHER" />
</intent-filter>
</activity>
<meta-data android:name="applovin.sdk.key"
android:value="ReplaceWithYourOwnSDK Key"/>
<meta-data android:name="com.google.android.gms.ads.AD_MANAGER_APP"
android:value="true"/>
</application>
</manifest>
ActivityMain.xml file<?xml version="1.0" encoding="utf-8"?>
<RelativeLayout xmlns:android="http://schemas.android.com/apk/res/android"
xmlns:app="http://schemas.android.com/apk/res-auto"
xmlns:tools="http://schemas.android.com/tools"
android:layout_width="match_parent"
android:layout_height="match_parent"
tools:context=".MainActivity">
<Button
android:id="@+id/showinterstitialadbutton"
android:layout_width="wrap_content"
android:layout_height="wrap_content"
android:layout_alignParentStart="true"
android:layout_alignParentTop="true"
android:layout_alignParentEnd="true"
android:layout_marginStart="113dp"
android:layout_marginTop="232dp"
android:layout_marginEnd="117dp"
android:text="Show Interstitial Ad"
app:layout_constraintBottom_toBottomOf="parent"
app:layout_constraintLeft_toLeftOf="parent"
app:layout_constraintRight_toRightOf="parent"
app:layout_constraintTop_toTopOf="parent" />
<com.applovin.mediation.ads.MaxAdView
xmlns:maxads="http://schemas.applovin.com/android/1.0"
android:id="@+id/MaxAdView"
maxads:adUnitId="Replace with your banner ad id"
android:background="@android:color/white"
android:layout_centerHorizontal="true"
android:layout_alignParentBottom="true"
android:layout_width="match_parent"
android:layout_height="50dp" />
</RelativeLayout>MainActivity.java ispackage com.learnandroidin15minutes.fanwithapplovin;
import androidx.appcompat.app.AppCompatActivity;
import android.content.Intent;
import android.os.Bundle;
import android.os.Handler;
import android.view.View;
import android.widget.Button;
import com.applovin.mediation.MaxAd;
import com.applovin.mediation.MaxAdListener;
import com.applovin.mediation.MaxError;
import com.applovin.mediation.ads.MaxAdView;
import com.applovin.mediation.ads.MaxInterstitialAd;
import com.applovin.sdk.AppLovinSdk;
import com.applovin.sdk.AppLovinSdkConfiguration;
import java.util.concurrent.TimeUnit;
public class MainActivity extends AppCompatActivity implements MaxAdViewAdListener {
private MaxInterstitialAd interstitialAd;
private int retryAttempt;
@Override
protected void onCreate(Bundle savedInstanceState) {
super.onCreate(savedInstanceState);
setContentView(R.layout.activity_main);
LoadBannerAd();
LoadMaxInterstitialAd();
Button showIntAdButton = findViewById(R.id.showinterstitialadbutton);
showIntAdButton.setOnClickListener(new View.OnClickListener() {
@Override
public void onClick(View view) {
ShowMaxInterstitialAd();
}
});
}
private MaxAdView adView; void LoadBannerAd() { AppLovinSdk.getInstance( this ).setMediationProvider( "max" ); AppLovinSdk.initializeSdk( this, new AppLovinSdk.SdkInitializationListener() { @Override public void onSdkInitialized(final AppLovinSdkConfiguration configuration) { } }); adView = new MaxAdView( "30212114136f32da", this ); adView.setListener( this ); // Stretch to the width of the screen for banners to be fully functional int width = ViewGroup.LayoutParams.MATCH_PARENT; // Banner height on phones and tablets is 50 and 90, respectively int heightPx = getResources().getDimensionPixelSize( R.dimen.banner_height ); adView.setLayoutParams( new FrameLayout.LayoutParams( width, heightPx ,Gravity.BOTTOM) ); // Set background or background color for banners to be fully functional adView.setBackgroundColor( getResources().getColor(R.color.background_color)); ViewGroup rootView = findViewById( android.R.id.content ); rootView.addView( adView ); // Load the ad adView.loadAd(); } // MAX Ad Listener @Override public void onAdLoaded(final MaxAd maxAd) {} @Override public void onAdLoadFailed(final String adUnitId, final MaxError error) {} @Override public void onAdDisplayFailed(final MaxAd maxAd, final MaxError error) {} @Override public void onAdClicked(final MaxAd maxAd) {} @Override public void onAdExpanded(final MaxAd maxAd) {} @Override public void onAdCollapsed(final MaxAd maxAd) {} @Override public void onAdDisplayed(final MaxAd maxAd) { } @Override public void onAdHidden(final MaxAd maxAd) {}
public void LoadMaxInterstitialAd(){
interstitialAd = new MaxInterstitialAd( "Your Interstittial Ad id here", this );
interstitialAd.setListener( this );
interstitialAd.loadAd();
}
public void ShowMaxInterstitialAd(){
if ( interstitialAd.isReady() )
{
interstitialAd.showAd();
Intent intent = new Intent(MainActivity.this, SecondActivity.class);
startActivity(intent);
}else {
Intent intent = new Intent(MainActivity.this, SecondActivity.class);
startActivity(intent);
}
}
@Override
public void onAdLoaded(final MaxAd maxAd)
{
retryAttempt = 0;
}
@Override
public void onAdLoadFailed(final String adUnitId, final MaxError error)
{
retryAttempt++;
long delayMillis = TimeUnit.SECONDS.toMillis( (long) Math.pow( 2, Math.min( 6, retryAttempt ) ) );
new Handler().postDelayed( new Runnable()
{
@Override
public void run()
{
interstitialAd.loadAd();
}
}, delayMillis );
}
@Override
public void onAdDisplayFailed(final MaxAd maxAd, final MaxError error)
{
interstitialAd.loadAd();
}
@Override
public void onAdDisplayed(final MaxAd maxAd) {}
@Override
public void onAdClicked(final MaxAd maxAd) {}
@Override
public void onAdHidden(final MaxAd maxAd)
{
interstitialAd.loadAd();
}
}Note: There is no need to add banner layout in xml file asits layout is defined programmatically.create Second Activity as test purpose as
package com.learnandroidin15minutes.fanwithapplovin;
import androidx.appcompat.app.AppCompatActivity;
import android.os.Bundle;
public class SecondActivity extends AppCompatActivity {
@Override
protected void onCreate(Bundle savedInstanceState) {
super.onCreate(savedInstanceState);
setContentView(R.layout.activity_second);
}
}<?xml version="1.0" encoding="utf-8"?>
<androidx.constraintlayout.widget.ConstraintLayout xmlns:android="http://schemas.android.com/apk/res/android"
xmlns:app="http://schemas.android.com/apk/res-auto"
xmlns:tools="http://schemas.android.com/tools"
android:layout_width="match_parent"
android:layout_height="match_parent"
tools:context=".SecondActivity">
<TextView
android:id="@+id/textView"
android:layout_width="wrap_content"
android:layout_height="wrap_content"
android:layout_marginTop="300dp"
android:text="Second Activity"
app:layout_constraintEnd_toEndOf="parent"
app:layout_constraintHorizontal_bias="0.498"
app:layout_constraintStart_toStartOf="parent"
app:layout_constraintTop_toTopOf="parent" />
</androidx.constraintlayout.widget.ConstraintLayout>
Watch full tutorial on YouTube and subscribe my Channel


bro kaam nhi kr rha hai ye tarika please help me call at +91 7985332883
ReplyDeletesir, re attempt this procedure, also watch video tutorial
Deletebro number de do apna please hamari company me sirf iski wjh se kafi dikkat aae rhi hai Developing Bee Pvt Ltd. please aap apna number share kr dijiye we will pay for the help
ReplyDeleteSir, what problem are you facing? Please write it here, I'll try to guide you.
Deletebrother thanku for this tutorial i have implemented successfully, i still have other questions related to Applovin.. can i have ur email pls? Thanks or reply me on rajeshbedis7@gmail.com
ReplyDeletebrother test ads to aagai and mene facebook se test mode b off kr dia h pr app live hone k baad ads show nhi ho rhi hai.. pls help
ReplyDelete