
 |
| Facebook apps bidding integration |
Facebook Audience Network helps developers
monetize their app by showing highly targeted ads that match the interests of
users. After using Admob, most of the developers use Facebook Audience Network
to earn good amount of revenue. Developers need their hard work to be rewarded,
so they try integrate ads in their apps to earn revenue. Now we can use
multiple accounts in our single app and use bidding to show which network ads
to be shown. The network ads having higher ecpm will win and ads of that
network will be shown.
What is Bidding:
A bid
is how much revenue will to paid to a developer for a specific action.
Different types of bids include cost per click or cost per 1000 impressions
(CPM). Advertisers budget is the maximum amount they are willing to spend on their
ad over a period of time. App bidding enables app publishers and developers to
establish an impartial and open auction over their ad inventory. All
advertising networks are used in apps simultaneously and the highest bidder for
the placement wins and the ads of higher bidder are shown in app, thereby
providing publishers with opportunities to earn more. Publishers can maximize
their access to high value advertisers.
In
simplest words, if we are using two ad networks in our app for example FAN and
Admob with open bidding using mediation, then ad requests will be called from
both networks. Now if Admob network gives us higher ecpm than FAN , then Admob
ads will be shown for that instance. Everytime an app gets ad requests, the
mediation platform will compare ads and ads having higher ecpm will win and
will be displayed to user.
Not willing to move your Facebook Apps to bidding?
If you are not willing to move your apps to bidding, then
FAN ads will stop to be shown on your app. There is no other option than moving
apps to bidding. You must have to move your apps to bidding to continue
displaying facebook ads on your apps. Moving facebook apps to bidding requires
some mediation platform. These mediation platform include Admob, MoPub,
Applovin MAX , Fyber, ironSource etc. If you are not willing to use Admob as
mediation partner, you can try other one. However in this tutorial , Admob will
be used as mediation platform.
Move your Facebook
Apps to Bidding using Admob as Mediation Platform:
To
successfully move your apps to bidding, follow these steps:
Requirements:
·
Facebook Business Account Login
·
Admob Login
·
Android Studio using Java
Now follow these simple steps:
Step No. 1:
Goto https://business.facebook.com and login and switch to your Business Account.


Now in your business
Account, click on Go to Business Settings

Now click on Monetization
Manager

Or you can
directly open Monetization manager by trying following link.

Step No.
2:
After opening
Monetization Manager, click on these menu three lines from left, click on
Integration dropdown menu and click on Bidding Integration.

Step No.
3:
Now select your
Mediation Platform as Admob and Select your app as shown below.

Please note that
if you have not added your app already in Facebook Properties, then first
create new Property ID, create Ad Placements and then follow step No. 3.
Step No.
4:
After selecting
your app, copy all Ad placement IDs into notepad as we need these ids later.

Paste ids to a
notepad


In next Window
check the checkbox of read_audience_network_insights and click
Generate Token

Copy the token,
property id, app id and paste to notepad as we need them later. Finally click
OK.


Step 5:
Now open
admob.google.com and Sign in. Now if you have not already added your app, then
first add your app and create ad units.
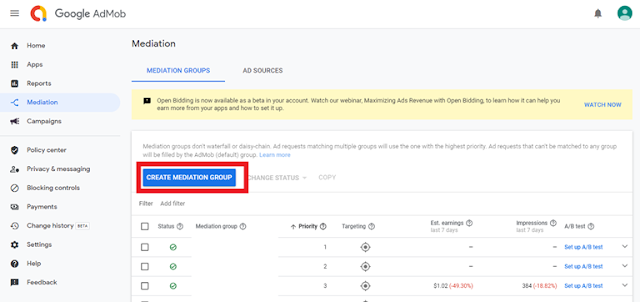
After creating
ad units, click on Mediation.

Click on Create
Mediation Group
In the next
Window, select Ad Format as Banner Ad and select Platform as Android and click
Continue

In next window,
write any mediation name as shown in picture below and click Add Ad Units

In the next
screen , select your app and click Done

After selecting
your app, below you will see two options Open Bidding and Waterfall. In Open Bidding , click on ADD AD SOURCE

In next Window,
select Facebook Audience Network

After selecting
FAN, in next window, you have to copy and facebook banner placement ID from
your notepad file you already pasted there and paste it in Placement ID box.
Finally click Done.

Now below Open
bidding there is option of Waterfall. In Waterfall tab, click on Add Ad Source.

Now in next
Window, in search box, write Facebook

After searching
facebook, select Facebook Audience Network

In next window,
write Label name or leave as it is and in Manual ecpm, write ecpm such as 1 USD

In next window,
paste here your facebook banner placement id and click done.

Finally click on
Save

Now you have
successfully created Mediation Group of banner ad. Repeat same steps to add
interstitial Ads.
To add Mediation
group of Interstitial Ads, goto Mediation and click on Create Mediation Group.
Now in Ad Format
, Select Interstitial , select Android platform and click Done.

In next window,
write Mediation group name and click Add Ad Units

In next window,
select your app and click done

After selecting
app, below is option of Open Bidding. In Open Bidding, click Add Ad Source

In next Window ,
select Facebook Audience Network

Now in next
window, copy Facebook Interstitial placement id from notepad and paste it here
in placement ID and click Done.

Now in
Waterfall, click on Add Ad Source

Search for
Facebook and select Facebook Audience Network and select it. In next Window,
write ecpm as 1 usd and click continue.

In next window,
copy facebook interstitial ad placement id from notepad and paste it here in
placement id and click done

Finally click on
Save

Now you have
successfully added mediation group of interstitial ads.
Note: You
may wonder that only placement ids are needed here in this tutorial, but please
note that for very first time when you create mediation , there maybe an option
of entering User Access Token, so in that case enter that copied token when
asked. Similarly App id may also be needed. Anyhow , it is pretty easy to
follow. Also note that admob may prompt you to accept policy terms and
conditions, so accept these terms and allow facebook and admob as mediation
partners if prompted. Finally you will get success notification after accepting
terms and conditions.
Step No. 6:
Now go to
Android studio and open your project. In App Level Build.gradle file, add multiDexEnabled true in
defaultConfig block

In App level
build.gradle, add these 3 dependencies,
implementation 'com.google.android.gms:play-services-ads:20.2.0'
implementation 'com.google.ads.mediation:facebook:6.5.0.0'
implementation 'com.google.android.ads:mediation-test-suite:2.0.0'
Please Note that you have to use latest versions of these
dependencies,

Now right click on res folder and create new resource
directory and name it xml

Write directory name as xml and click ok.

Now right click on xml and click on click on New and click
on XML Resource File

Now name the file as network_security_config and click OK

Now open this network_security_config.xml file and remove all present code and paste the following code.
<?xml version="1.0" encoding="utf-8"?>
<network-security-config>
    <domain-config cleartextTrafficPermitted="true">
        <domain includeSubdomains="true">127.0.0.1</domain>
    </domain-config>
</network-security-config>
Now goto
AndroidManifest.xml file add internet permission.
<uses-permission android:name="android.permission.INTERNET" />
Now under application tag, add following lines
android:networkSecurityConfig="@xml/network_security_config"
tools:targetApi="n"
Now under application tag , add following meta-data code
<meta-data
    android:name="com.google.android.gms.ads.APPLICATION_ID"
    android:value="@string/admobAppLevelIDManifest" />
Finally AndroidManifest.xml file be like this
<?xml version="1.0" encoding="utf-8"?> |
Now we have to create banner ad container in
ActivityMain.xml alongwith a button like this
<?xml version="1.0" encoding="utf-8"?> |
Now you have to add real Admob banner and interstitial ad
ids in Strings.xml file. Remember, you have to use real ad ids not test ad ids.
Strings.xml file:
<resources> |
Now you have to goto MainActivity.java and initialize sdk as follows inside onCreate MobileAds.initialize(this, new OnInitializationCompleteListener() { |
Now outside of onCreate, create these three methods, loadBannerAds(), loadInterstitialAds(), showInterstitialAds() like these.
public void ShowBannerAds(){ |
Then in buttonClick Listener, call showInterstitialAds(); methodThe final MainActivity.java should look like this
package com.example.fbbiddingwithadmobmediation; import java.util.Map; public class MainActivity extends AppCompatActivity { private AdView mAdView; private InterstitialAd mInterstitialAd; @Override |
Now uncomment the line MediationTestSuite.launch(MainActivity.this);
Step No. 7:Now we have to add our android device as test device in both admob and facebook interface.First goto settings in your android phone, then goto GoogleAfter that, click on Ads, here you will see Your Advertising ID. Copy/write that id to notepad file as we need that id both for admob and FAN. 
Now goto admob.google.com and click on settings. And click on Test Devices tab and click Add Test Device button. Now write device name, select android and paste advertising ad you got from your phone and finally click on Save.
Step No. 8:
Now we have to add our phone as test device in facebook.
Open business.facebook.com and goto Monetization manager,
next Click on Integration and click on Testing

Now Switch ON Testing Enabled and write here Advertising Id
you copied from your android phone and write name of device and click Add.

Finally you have successfully added test device in facebook.
Now you have to go back to android studio and run your
application in your same phone.
After successful installation, you will get Mediation Test Suite
prompt, here you have to test facebook and admob open bidding and waterfall
ads.
Note: Sometimes in Open Bidding , facebook does not
instantly show ads , so if you get error of No Fill from source, don’t worry,
just publish your app on PlayStore, after a couple of days, when fb approves your app for bidding, you will start
to get fb ads on Open bidding. Till that time only waterfall ads will be shown.
Finally, before creating final Signed apk, just remove
mediation test suite dependency and code as this may create warnings of special
permission error while uploading on playstore.
Just remove these lines.
mplementation 'com.google.android.ads:mediation-test-suite:2.0.0'
MediationTestSuite.launch(MainActivity.this);Finally you have successfully moved your apps to bidding. Congratus.Facebook ads might display for open bidding after a few days. If you still face No fill from Ad Source, then it may not the problem of integration, you may have to contact facebook support to resolve this issue. They will fix it.
For full info, Watch this 16 minutes video Tutorial
Hello sir! This is Muhammad Saqib Rehan. I have seen your video "Facebook Move your apps to Bidding". I have Done everything the same as shown in video but I am gettig error No fill from the ad source and also in facebook monitization there is a warning of waiting for big request. Please help me > I am suffering from ad limits for more than 1 year
ReplyDelete